Total Pageviews

Friday, June 21, 2013

Time out for some fun!


This is the charming town of Westport Wa.

It's a tiny little town with smaller fishing boats, views views views!
Some of the best clam chowder around and if you like clams strips , you have to try them at Bennett' s ! They are the size of your  little  finger full of yummy goodness! 


 Decided to take a trip across the harbor to Westport
for a little lunch and sightseeing. At one time there was a ferry that crossed the harbor from OCEAN SHORES WA. to 
WEST-PORT  WA.
but sadly the ferry went out of business .... 
Our grandson Christian enjoying the views! 


                               My artistic shot of the day! 

                               
                            We had some guests for breakfast
                               before we left for the day!


                   The sun decided to come out so Christian is
                           ready to do some skim boarding! 
                               We're off  to the beach!


                The water is really cold here so wet suits are 
                       a good idea even when the sun shines!
                               

View of West-Port from Ocean Shores side !

Ah sunset , pink skies and a big fat frozen 


frozen black cherry hard lemonade for me!
ah this IS the life!

Tuesday, June 18, 2013

Woo Hoo


Woo Hoo my husband's Pottery Barn knock off shelves have been featured on this awesome blog! Thank you Beckie
I happened on this site from Pinterest , and discovered clever Knock offs of name brands for huge savings. Great blogs especially for the DIY lover! Love this blog so many great ideas ! 

Monday, June 17, 2013

Our Pottery Barn Knockoff Shelves!


To decorate our little beach get away, we had to get creative, or rather my husband did.   Previously, I  had posted a picture of our master bedroom as original owner had decorated it. 

While I like the shelves idea , we both disliked the cheesy cheap shelves.Trying saying that  3 times! LOL..

In my collection of images of beach house decor , I had saved a Pottery Barn image of the Nantucket bedroom .... Everything was sumptuous and expensive ... of course everything I seem to gravitate to is.... What caught my eye was this wonderful shelf behind the bed.. Isn't it gorgeous? 

However , the price was way more than I could justify when we had so many other things like exterior painting , shed, interior painting to do.  I saved the photo for my wish list, until one day my husband Terry, asked me if I wanted him to hang the original shelves back up in our room.  When I told him no , he was a little surprised, then I showed him my wish listed shelf... He said he could probably make one like it if I wanted it ..... Yes yes yes!!! I wanted one just like this one and while he was at it could he make the smaller one form PB too?  I pulled out another image  from my wish list :
 
Terry had a stock pile of wood left over from a wood head board  he had already dismantled .  He was able to created 7 different shelves from this one headboard! The only purchase we had to made was the dentil molding for the 2 larger shelves Which was $37.00 for 8 ft piece.

For a DIY project is didn't get any better than this! 
Since Terry was using preexisting wood  shelves they dictated the depth of the top shelf, 
in this case 6"  by 45" in length
the back piece was 10" wide  and cut to measure 43" so that the top of the shelf has an overhang .
For interior framed shelf he measured in on each side 2 inches on . Making the interior shelf  about  39". This was just a simple 3 sided box shape longest length was 38"  1" by 2" wide  
If one wanted to cheat on this step you could cut any existing cheap frame that would give you the width and depth , simply cut to fit. Notice the decorative white frames sitting on top of the shelf imagine cutting on of those and fitting it on this shelf you could skip having to miter the edges.  Terry's skill level is a lot higher than mine so if I were creating this I would cheat and use a existing frame. I'm just saying..
Everything is glued and nailed together, Terry is a big fan of measure twice cut once rule... 
If you click this picture you can get a closeup view of the way the dentil molding is applied. It is cut like you are creating a frame flat side is used to create interior shelf. Miter box will be your best friend to cut the 45 degree angles need.  Play with scrap wood first so you don't make errors on the expensive dentil molding!


As this point Terry dry fits everything to be sure it goes together properly. Once satisfied , glue and nail ( Terry Used nail gun) top piece to the back .  Then assemble the interior frame shelf by gluing and nailing. Any nail holes will be filled with wood putty .
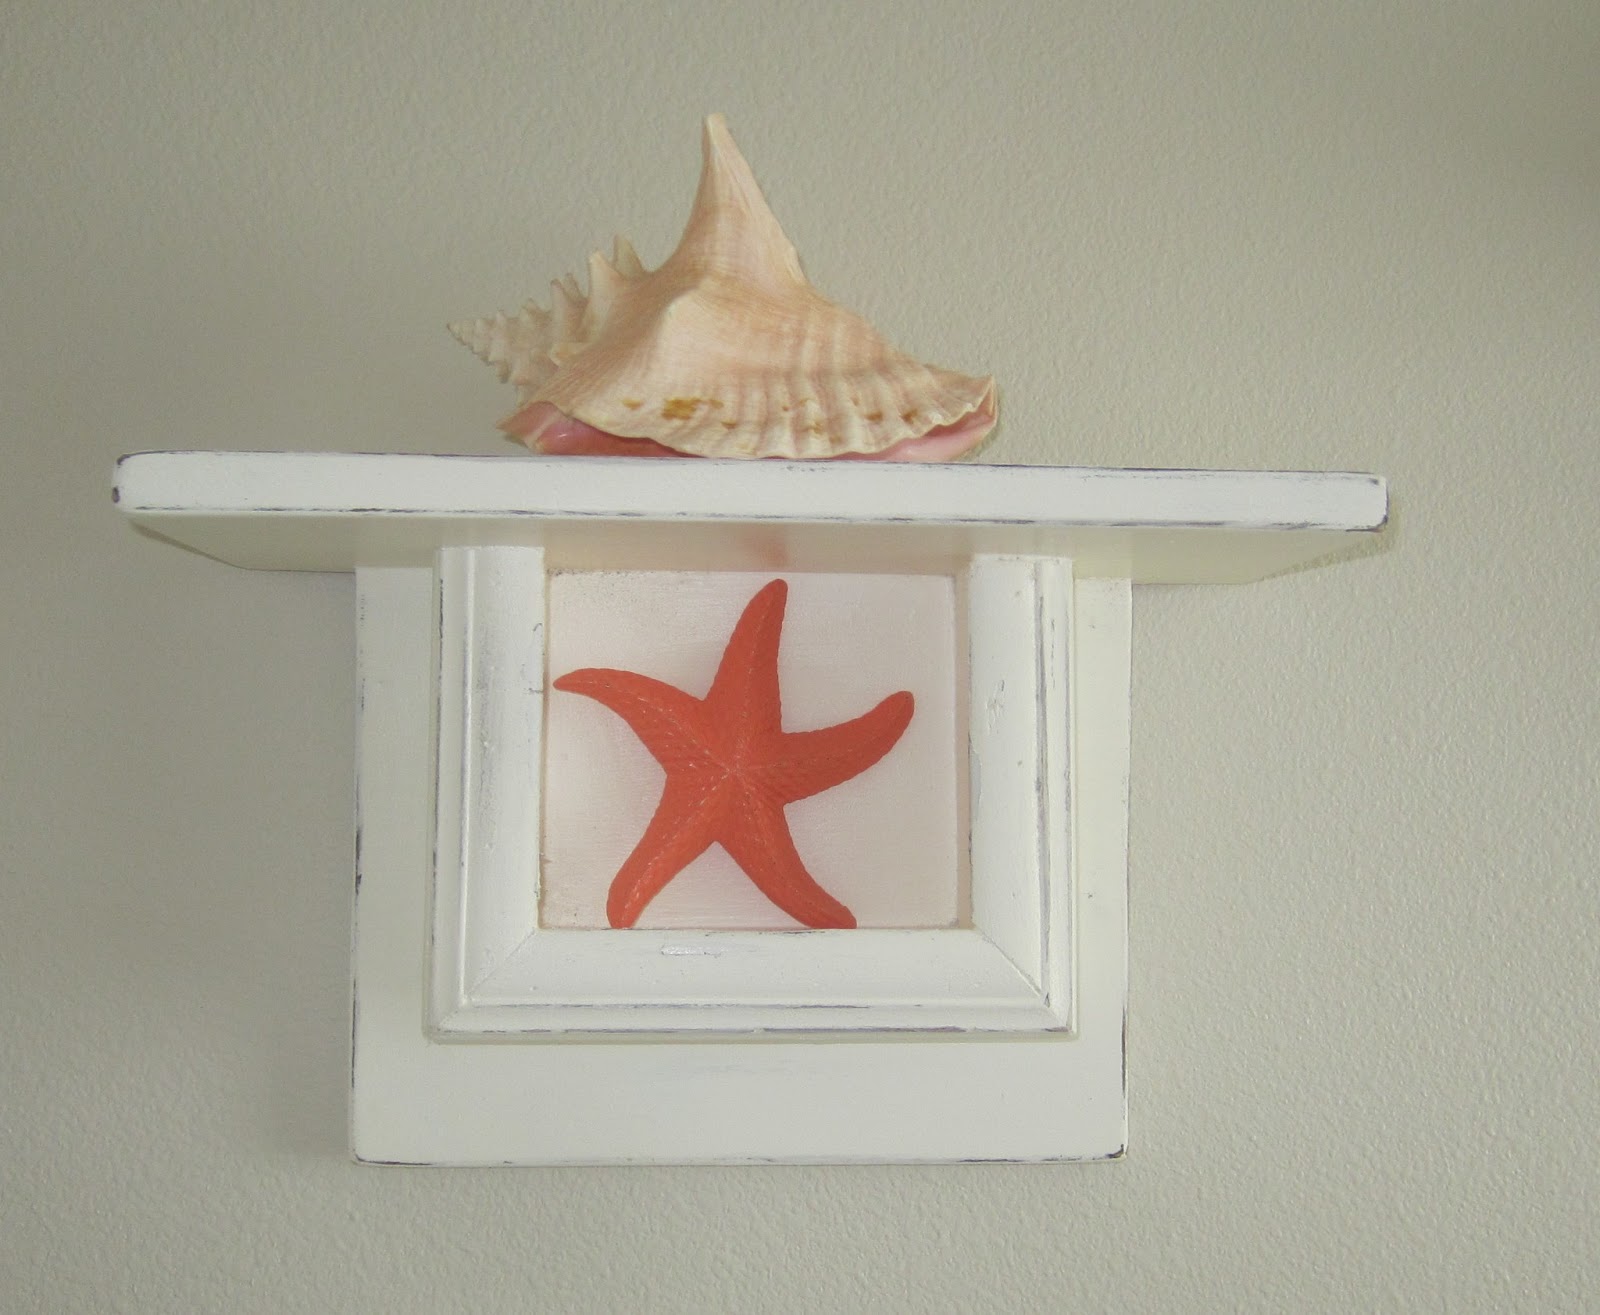
Once assembled and dry it was my turn . I painted the shelves with antique white satin interior paint..  for well, the white ones and  and robins egg blues for the blue ones. Double coat. Once dry I sanded the tops  and edges in sum places down to the wood. Once I was satisfied with the worn look I used  a antiquing technique , working with diluted  dark brown acrylic paint. I prefer a thin wash and easy clean up. Basically , work in small areas with a paint brush dab or brush on color and with a clean wipe off excessive until you are happy with results. Since I used water based acrylic I could dampen the cloth slightly if my aging looked too heavy . You could use a dark stain varnish too, however it's not as easy to deal with.

Terry's Pottery Barn knockoffs!


Saturday, June 15, 2013

Shutters for Endless Summer Cottage.

After Endless Summer was painted it still looked  well, incomplete. It lacked a personality....  
After searching the internet for something that might add the personality I was looking for, I found these delightful shutters by  Jane Coslick . I was so excited I emailed her immediately to inquire about the  price.....  Well, needless to say my skinny budget wasn't up to the cost!  Around $400 for a set.... sigh!

So I approached my husband about making a set of shutters for the house. As always, he just wanted a picture of what I wanted; he was ready and willing to take on a new challenge.  Not sure about the style I wanted,  I  began a new search for different styles of shutters , I never realized just how many styles there were.
Since ours were purely decorative , we didn't storm hinges because they would be permanently attached in the open position. I found  this adorable sail boat shutter and fell in love! 


We decided to make our shutter the same size as the ones pictured here. the exact size of our window. Which was great because as it turned out , one 8ft. board cut in half was exactly the right size for one shutter! And Home Depot even cut them  for us! Yay! 

My husbands list for this project: Total cost 
a wallet saving $40.00 ! 

2 ) 8 ft. pine boards 1" by 6" wide pine boards ( you use whatever wood you like)

1) 6 ft.  1" by 4"  board for the cross bars. this board will be cut into 4 pieces 1 inch shorter then the shutters.

Wood Glue ( yellow kind heavy duty)

24) stainless steel wood screws  1 7/8 inch

Jig saw for cutting out sail boat Or whatever pattern you choose.

template for cut out

exterior paint 

After lightly sanding all of the ends of the boards , the shutters were temporarily assembled  so template pattern could be positioned  where we wanted and transferred on to the boards .  disassemble the shutters, then using jig saw cut out sail boat pattern .  

Lightly sand the new cuts. At this point you can assemble them permanently then paint. Since our shutters needed to withstand blistery winds &the heavy rains of coastal Washington, my husband opted to paint all parts 2 times before reassembling. Hint doing this makes wood last longer, and if you forget to mirror the images there's no problem because all sides are painted.

Once dried  lay out your shutters ,measuring 6 inches from the top and bottom edges for placement of cross bars.Using wood glue on back side of each cross bar, place on  shutters, and screw in place. using 4 screws in each cross bar, 2 for each board .
Now your ready to mount your shutter to your house . Four screws were used in each shutter . If you look closely you can just make out the outline of the final screw placement. My husband touched up the screws with paint. 


Now that's personality !!

People have stopped by several times since we have painted ,asking what colors we used  and telling us how much they love it!
Neighbors have stopped by too, happy to see the"little house" isn't sitting empty anymore and loving the new look!


,  


Friday, June 14, 2013

Finding our Endless Summer Dream...............

When the economy took a turn for the worst, I thought our dreams to have a beach cottage was gone forever.........
 We continued to look for affordable properties a long the Oregon coast. What we found were ,  old cottages that would require complete renovations . Having a limited budget of 120 K  there wasn't room left to do the kind of massive renovations most coastal cottages needed. Besides being old ,  the affordable ones had no view of any kind , more like old tract homes long neglected behind new small strip malls. 
  
 Pressing desire to own a tiny piece of beach living keep me searching , finally one search took me to coastal  Wa.   I happened upon new cottages being built within our price range, 2 bedrooms , 1 bathroom with a great room/kitchen setup. The finishes were granite, with stainless steel appliances...... While older places may have more classic details, there is something to be said for worry- free brand new everything. Here is an example of what is being built.....119K these little cuties are around 857 sq. ft.


However, I have visions of our kids and grand-kids joining our beach get away with us from time to time. One bathroom was not going to cut it.  Then I found this house online:

 It didn't have much as far as curb , or in this case beach appeal but it had something that caught my imagination:


Tucked inside this sort of boring exterior was this fabulous natural rock fireplace, and great room!  When I first stepped inside it was ours. My husband and I couldn't get this house out of our minds. It was a budget busting 150K  but...  and this was a huge but, it had been on the market for 3 yrs!!!!! The owners had moved to Calif and were motivated to get out  from under it.  They left the house almost fully furnished, and  that included full kitchen ware pots , pans , glass ware, even stemware! 
This beach cottage would be a huge  savings for us, as I pointed out to my husband, Terry, who was worried about our bottom line. Without the added pressure of finding affordable furnishings , we could replace things as we could afford it.  
   Plus this house had something else the others didn't have, to full bathrooms, large master and a massive trex deck patio on the front of the house for watching those gorgeous sunsets and sipping what I like to call "Loaded Slushies" . Those wonderful mixed drinks that you freeze and serve Yummy!  AND a covered attached patio on the back for sunrises....


After some back and forth negotiations this little gem was ours! Only 5 yrs. old it came through inspections with flying colors! Another view from kitchen looking into the living area.

The first thing we tackled after closing, was weed whacking and removing a tons of useless stuff like previous owners bedding, a horrific monster bunk bed thing that was in the guest bedroom and double headboard thing that we actually ended up dismantling and re-purposing into shelves. 
I had been collecting pictures of what I thought I wanted in our beach cottage. It came with big comfy leather couch and love seat, a nifty coffee table with hidden storage, the dining set picture above. These were things that weren't going anywhere, anytime soon.  To save money I recovered the cushions on the dining chairs. The padded window covering were given a new material , once pale yellow marked up walls were repainted a warm white.
 I found 3
adorable stools for a thrifty $18 a piece in colors I quickly decided to use as my go to color palette.. We purchased a neutral color chair for extra sitting and I commandeered on of the stools and re-purposed as a small surface to place drinks, or book. 

While I had dream of these decors :

 I quickly came to realize that , I craved color and wanted the cottage to feel fun...... So our bedroom went from this in your face blue (previous owners choice) to the calm fun feel ....
 
Remember that headboard we dismantled? Well they became the 3 Pottery Barn Knockoff shelves above the bed. Courtesy of my talented hubby. I asked him to recreate these shelves I soooo wanted from Pottery Barn , but just couldn't justify spending a whopping 700.00 for the three of them when I needed other furnishings first. 


I am the proud possessor of 7  of these awesome shelves created for me by my hubby!  Best part, they were all free! Using the wood from the old headboard we were able to make all of these shelves. Only item purchased was dental molding for the 2) 5 ft shelves the last 2 pictures are from our guest bedroom in Oregon

For our guest bedroom at the cottage I wanted total fun! I was able to snag a few vintage sand toys and pails for this room as part of the decorations. A new $99 bed  frame & $69 side table from Ikea and ta da a cozy beach bedroom. Over the window I have another shelf with more beach toys  and canvas signal flags.


When it finally came  time to paint the outside of the cottage, it was torture.... We went back and forward over colors with names like comfort gray, tide pool , drizzle , nautical blue , tropical blue sea glass. 
You wouldn't think that selecting colors would be that difficult, but in truth it was agonizing. Especially when there are endless colors to select from these days. Finally after much debating we agreed on Drizzle and Tidewater with Alabaster for the trim and ravishing color for the door. 
 From this 
               
                                              to this

Once again ,I enlisted my talented husband to create shutters for me. The front window still looked a little plain, so I rummaged through my beach house images files,which was huge, and located a picture of what I had in mind .

 I drew a template for my husband using the house above and the result was pretty close! It was the finishing touch we needed.  I found this great surfboard on Craig's list the had  OUR initials TVS already on it!  It was meant to be!


It's funny how things fall into place , my husband & I wanted a place to store his yard equipment,that it was taking up valuable closet real estate! We found a cedar shed at Home Depot that they had marked down from $1200  to a wallet saving 650.00!!! I was so happy I couldn't stand it! Terry painted to it match the house, so cute! Seen in  the background.